
How to Build a DIY CD/DVD Duplicator
Have you ever thought about building your own CD or DVD duplicator machine? Maybe you’re looking to truly personalize your business production model or you’re just a hands-on kind of person. Or maybe you want to try to save a little bit of money as duplicators can be quite an investment if bought retail. Keep in mind, however: this is a task for advanced users. But if you’re ready to learn how to build your own disc duplicator, let’s start.
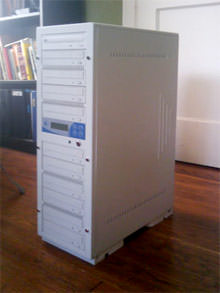
How to Build a Standalone Disc Duplicator in 10 Steps
A standalone duplicator is a self-contained machine for copying CD, DVD, or Blu-ray discs. It requires nothing but a 110-volt electrical outlet to operate. All tower functions are stored in a control board, also called a “controller.”
Material list:
- Case
- Power Supply
- Burner drives (IDE or SATA)
- Controller board
- Hard drive (optional)
- Blank discs and master discs
- Screwdriver
- Cable ties (optional)
Step 1:
Decide how many burner drives you want. Smaller towers are less expensive but will require more runs to complete large jobs. Large towers will have a higher initial cost but will provide more output.
Step 2:
Choose a case with the appropriate number of drive bays. Make sure to allow extra space for the controller board. If your case includes a power supply, check to make sure the output is at least 400 watts or higher to run all the drives.
Step 3:
Pick a controller. The controller will be used for all the copying functions, so you want to pick one with lots of features and is easy to use. You may have to buy this from an online retailer as it is a specialty item.
Step 4:
Make sure the burner drives you purchase are compatible with the controller (IDE or SATA) and the power connections are the same. If they are different, you will need to use adapters to make them work.
Step 5:
It’s time to begin assembly now that you have all the components. Remove the side panels from your tower case.
Step 6:
Install the power supply if it is not already installed.
Step 7:
Install burner drives using screws included with case. Make sure they line up with the front bezel of the case.
Step 8:
Connect the cables to the controller according to the instruction manual provided with the controller. Slide the controller into the tower at the top or in the middle, depending on your preferences.
Step 9:
Attach to the power and data cables to each drive. Use cable ties to bundle cables together and make sure they will not interfere with fans or block airflow through the chassis.
Step 10:
Power the machine on for the first test. Make sure all drives are recognized and functioning properly. Try a burn test to ensure perfect operation. If everything looks good, reattach side panels and you’re done!
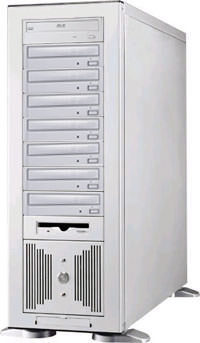
How to Build a PC-Based Disc Duplicator in 8 Steps
Materials list:
- Large computer case
- Power supply
- Burner drives (IDE or SATA)
- Motherboard, CPU, memory, hard drive
- Keyboard, monitor, mouse
- Burning software
- Blank and master discs
- Screwdriver
- Cable ties (optional)
A PC based duplicator is basically a personal computer with one or more optical burner drives connected together. A software program runs on top of the operating system in order to control the loading, copying, and burning discs. A duplicator built using a personal computer will only be able to handle as many drives as the motherboard supports, which is typically between 1 and 6 drives.
Step 1:
Choose how many recording drives your tower will have. Bear in mind that most PC cases offer 2-4 5.25” drive bays. You may need to buy a specialty case to build a large duplicator of more than four drives.
Step 2:
Check if your case includes a power supply, and if it does, check that it will have enough connections to support a large sized duplicator plus all the computer peripherals. Take the time to research these components carefully.
Step 3:
Purchase necessary PC components that are standard with most PCs. These include a motherboard, CPU, memory, video card, and hard drive. You will also need a monitor, keyboard, and mouse.
Step 4:
Choose which type of burners will go in the tower. We advise sticking with major brands such as Sony, Pioneer, NEC, Samsung, etc. With CD/DVD burners, price is often a good indication of quality.
Step 5:
Build the computer portion of the tower first. Install all components as you would a normal PC. Make sure to install your monitor, keyboard, and mouse. Install the operating system and make sure everything is up to date.
Step 6:
Shut the machine off and install burner drives. Align the drive holes with the holes or slots of your computer case and screw in securely.
Step 7:
Restart the computer and install your chosen recording software.
Step 8:
Test your new duplicator. Try recording with Cd or DVD discs to make sure everything is working as intended. You can also experiment with loading and saving ISO files on your computer’s hard drive. You’re done!
Notes
Building your own DIY CD or DVD duplicator is rewarding but is something to be attempted by experienced users who have previously built a computer. They are an investment of both time and money. Lots of people are attracted to DIY duplicators as a cost saving measure, however with the specialty parts, minimum order quantities, and other factors, costs can quickly spiral out of control if you are not careful. It may be cheaper to purchase a pre-made duplicator from a major manufacturer or look into professional disc services. Store bought machines come with several benefits: high quality components, quality testing, and warranties.
Be sure to research which option would be better for you.